GobyでHello World してみた
はてブのホッテントリを眺めていたところ、Gobyという言語についての記事があったので環境構築&Hello Worldしたくなったのでやってみた。
GobyはRuby + Go みたいな感じらしい。
インストール方法
brewで一発。
brew tap goby-lang/goby
brew install goby
Hello World コード
サーバ立ててHello Worldと出す感じかな? よくわからない・・・
これと同じものを使っている。
require "net/simple_server"

server = Net::SimpleServer.new("3000")

i = 0

server.get("/") do |req, res|
  puts(i)
  i = i+1
  res.body = req.method + " Hello World"
  res.status = 200
end

server.get("/not_found") do |req, res|
  res.body = "Not Found"
  res.status = 404
end

server.start
Pleromaを入れてみた話
一部では話題になっているPleromaを入れてみました。
できたものはこれです。 Pleroma/mimikun-Dev
所要時間は多分5hくらい。
最初はAWSで立てようと思っていましたが、MastodonのフォロワーさんがMastodonが動いているサーバで一緒に動かしても大丈夫と言っていたのでそうしてみることにしました。
環境
手順
既にMastodonが入っているサーバに入れました。
1. いろいろアップデート
sudo apt update
sudo apt upgrade -y
2. 必要なものを入れていく
sudo apt install git build-essential openssl ssh sudo postgresql-9.6 postgresql-contrib-9.6
postgres-9.6なんかないよ??と言われるのでリポジトリを追加します。
3. postgresのリポジトリを追加する
sudo vim /etc/apt/sources.list.d/pgdg.list
echo 'deb http://apt.postgresql.org/pub/repos/apt/ xenial-pgdg main' > /etc/apt/sources.list.d/pgdg.list
wget --quiet -O - https://www.postgresql.org/media/keys/ACCC4CF8.asc | \
apt-key add -
その後postgres-9.6を入れます。
sudo apt update
sudo apt install postgresql-9.6 postgresql-contrib-9.6
4. Elixirを入れる
まずリポジトリを追加します。
なにもせずapt installすると古いものが入るためです。
wget https://packages.erlang-solutions.com/erlang-solutions_1.0_all.deb
dpkg -i erlang-solutions_1.0_all.deb
リポジトリ追加が終わったら、erlang-solutions_1.0_all.debは不要なので消しておきます。
rm erlang-solutions_1.0_all.deb
Elixirなどを入れていきます。
sudo apt update
sudo apt install elixir erlang-dev erlang-parsetools erlang-xmerl
5. Pleromaユーザを追加する
Pleroma用のユーザを追加します。
su root
adduser pleroma
パスワードを適切に入力します。
それ以外はEnter連打で大丈夫だと思います。よく知らんけど
usermod -aG sudo pleroma
pleromaをsudoグループに入れます。
これでsudo出来るようになります。
su pleroma
ユーザを切り替えます。
cd ~
ホームディレクトリに移動しておきます。
6. Pleroma本体を入れる
GitLabからソースコードをcloneしてきます。
フォークしておくと色々役立つのでフォークしてから入れた方が色々と良いです。
git clone https://git.pleroma.social/username/pleroma
依存関係のインストールをしていきます。
mix deps.get
途中でなにかインストールを求められたらYと答えておきます。
次に、設定ファイルの作成をします。
mix generate_config
少し時間がかかります。
ここでも途中でなにかインストールを求められたらYと答えておきます。
色々Warningが出ますが大丈夫らしいので気にしないで待ちましょう。
すると、こういうのが出ます。
What is your domain name? (e.g. pleroma.soykaf.com):
What is the name of your instance? (e.g. Pleroma/Soykaf):
What's your admin email address:
それぞれの欄に、ドメイン名、インスタンス名、管理者のメールアドレスを答えます。
その後、こういうのが出てきます。
メディアプロキシを有効にするか?ってことらしいです。
Do you want to activate the mediaproxy? (y/N):
自分はyと答えましたが、そうするとなぜか画像が表示されなくなったのでNにしておくといいと思います。
Pleromaなんもわからん
このメディアプロキシに関して詳しくはここにあります。
ここまでの質問に答えると、config/generated_config.exsという色々な設定が書かれたファイルが生成されます。
その後、config/generated_config.exsをconfig/prod.secret.exsにリネームします。
mv config/generated_config.exs config/prod.secret.exs
続いて、データベースのセットアップをします。
sudo su postgres -c 'psql -f config/setup_db.psql'
続いて、データベースのマイグレーションをします。
MIX_ENV=prod mix ecto.migrate
7. SSL証明書の設定
SSL証明書の設定をします。
僕はLet’s Encryptを使いました。
sudo systemctl stop nginx
sudo letsencrypt certonly --standalone -d example.com
メールアドレス入力を求められたら入力しておきます。
SSL証明書の期限切れが近づくと入力したメールアドレスにメールが来ます。
8. nginxの設定
nginxの設定をします。
Pleromaは親切なつくりなので、テンプレートが用意されています。
なのでこれをコピーしていきます。
cp /home/pleroma/pleroma/installation/pleroma.nginx /etc/nginx/sites-enabled/pleroma.nginx
ドメイン名を編集していきます。
sudo vim /etc/nginx/sites-enabled/pleroma.nginx
Vimの置換でexample.tldを自分のドメインに置き換えておきます。
その後、nginxの再起動をします。
sudo systemctl start nginx
sudo systemctl restart nginx
9. Pleromaのサービス化
これもテンプレートを用意してくれています。とても親切です。
cp /home/pleroma/pleroma/installation/pleroma.service /etc/systemd/system/pleroma.service
コピーしたら少し編集します。
sudo vim /etc/systemd/system/pleroma.service
[Service]のEnvironmentを編集します。
[Service]
User=pleroma
WorkingDirectory=/home/pleroma/pleroma
- Environment="HOME=/home/pleroma"
+ Environment="MIX_ENV=prod"
ExecStart=/usr/local/bin/mix phx.server
ExecReload=/bin/kill $MAINPID
KillMode=process
Restart=on-failure
Environment="MIX_ENV=prod"になっていればOKです。
10. Pleromaの起動
sudo systemctl enable --now pleroma.service
sudo systemctl start pleroma.service
(僕の環境ではFailed to execute operation: Invalid argumentが出てきた。 sudo systemctl is-enabled pleroma.serviceでenableになっているか確認するとenableになっていた。まぁ多分大丈夫だと思います。)
これで終わりです。おつかれさまでした。
感想
Elixirなんにもわからなくても立てられるという感じでした。まぁそりゃそうか
フロントエンドはVueで書かれているらしいのでVueを勉強したくなりました。
参考にしたサイト
ubuntuにpleromaを入れてなんとなく動かす – Theoria Note
PleromaをGoogle Cloud Platformで建ててみた - Qiita
How to activate mediaproxy · Wiki · Pleroma / pleroma · GitLab
Elmの環境構築メモ
Elmのインストール
インストーラからインストールできるようです。
Install · An Introduction to Elm
私はnpmで入れました。
npm i -g elm
エディタの設定
私はAtomを使っているので、Atomの設定だけ書いておきます。
language-elmを入れます。
apmを使うと一発で入ります。
apm i language-elm
構文が比較的シンプルで良いな、と思ったのでちょっとElmで遊んでみようと思います。
MastodonのWeb UI左下にいる象さんを別なイラストに置き換えた
MastodonのWeb UI左下にいる象さんを別なイラストに置き換えたかったので置き換えてみました。
ソースコードのリンクはここにあります。
手順
2通りあります。
1. リネームして入れる
一番簡単です。
cd mastodon
cp 置き換えたい画像.svg app/javascript/images/elephant_ui_plane.svg
mv app/javascript/images/elephant_ui_plane.svg app/javascript/images/elephant_ui_plane_old.svg
mv app/javascript/images/置き換えたい画像.svg app/javascript/images/elephant_ui_plane.svg
2. ソースコードのリンクを書き換える
更新の時手間取る可能性があります。
- 置き換えたい画像をディレクトリにコピーしてくる
cd mastodon
cp 置き換えたい画像.svg app/javascript/images/
mastodon/app/javascript/mastodon/features/compose/index.jsの15行目をこのように書き換える
- import elephantUIPlane from '../../../images/elephant_ui_plane.svg';
+ import elephantUIPlane from '../../../images/置き換えたい画像.svg';
結果
before: 左 after: 右


Errno::EACCES: Permission denied @ dir_s_mkdir が出たので対処した
環境
自分の状況など
これまではrbenvでRubyを扱っていたが、2018年3月21日からanyenvで入れたrbenvを使う形式に変えた。
その際に、rbenvのディレクトリをsudo rm -rf .rbenv という形で削除した。
そして今日(2018年3月22日)、rails newしたらこのようなエラーが出た。(エラー部分だけ記述)
Fetching bindex 0.5.0
Installing bindex 0.5.0 with native extensions
Errno::EACCES: Permission denied @ dir_s_mkdir -
/usr/local/lib/ruby/gems/2.5.0/extensions/x86_64-darwin-17/2.5.0/bindex-0.5.0
An error occurred while installing bindex (0.5.0), and Bundler
cannot continue.
Make sure that `gem install bindex -v '0.5.0'` succeeds before bundling.

In Gemfile:
  web-console was resolved to 3.5.1, which depends on
    bindex
         run  bundle exec spring binstub --all
bundler: command not found: spring
Install missing gem executables with `bundle install`
最初は指示通り、gem install bindex -v '0.5.0'としたが、直らなかったので色々調べた。
その結果わかったことを以下に記す。
手順
ディレクトリやファイルの所有者が root になっていたので、次のコマンドで username にしてやる。
chown -R username /usr/local/lib/ruby/gems/2.5.0/extensions
-R オプションをつけると、ディレクトリとその中身を再帰的に変更してくれる。
参考にした記事など
[macOS Sierra] nokogiri インストール中のエラー "Permission denied @ dir_s_mkdir" の 1解決手法 - Qiita
Dev鯖用にMastodonを立ててみた話
なぜ立てようと思ったか
mstdn.mimikun.jp ではYouTube動画の埋め込みだけがうまく機能しない、という状況になっていました。
それならもう一個Mastodon鯖を立てて、同じコードで同じように動かしてみよう、と思ったのがきっかけです。
手順
全くの素人がConoHaとS3でMastodonインスタンスを立ててみたお話 - Qiita
まずはここを見て作業しました。
ssh root@150.95.181.16

パスワード入力

➜  ~ git:(master) ✗ ssh root@150.95.181.16

The authenticity of host '150.95.181.16 (150.95.181.16)' can't be established.
ECDSA key fingerprint is SHA256:QGoqWATsm4F8cjPLP6r9EfendQaOjmHS8UMtIO1YIc8.
Are you sure you want to continue connecting (yes/no)? yes
Warning: Permanently added '150.95.181.16' (ECDSA) to the list of known hosts.
root@150.95.181.16's password:
Welcome to Ubuntu 16.04.1 LTS (GNU/Linux 4.4.0-57-generic x86_64)

 * Documentation:  https://help.ubuntu.com
 * Management:     https://landscape.canonical.com
 * Support:        https://ubuntu.com/advantage

224 packages can be updated.
116 updates are security updates.


_____________________________________________________________________
WARNING! Your environment specifies an invalid locale.
 The unknown environment variables are:
   LC_CTYPE=ja_JP.UTF-8 LC_ALL=
 This can affect your user experience significantly, including the
 ability to manage packages. You may install the locales by running:

   sudo apt-get install language-pack-ja
     or
   sudo locale-gen ja_JP.UTF-8

To see all available language packs, run:
   apt-cache search "^language-pack-[a-z][a-z]$"
To disable this message for all users, run:
   sudo touch /var/lib/cloud/instance/locale-check.skip
_____________________________________________________________________

root@150-95-181-16:~#
成功です。
言語設定を日本語にする。
$ sudo apt-get install language-pack-ja
$ sudo update-locale LANG=ja_JP.UTF-8
これが出ないようにする
sudo: ホスト 150-95-181-16 の名前解決ができません
nano /etc/hosts
127.0.1.1 ubuntu # 元からあった
127.0.0.1 150-95-181-16 # 追記した
SSH Keyの登録
ここを見ました。
ConohaにVPSを設置して、SSHログイン、ポート番号変更、rootログイン禁止までを30分で! - Qiita
この記事はCentOS向けに書かれていたので、adduser のところはここを見ました。
ubuntu ユーザを追加して sudo 権限をつける - Qiita
以下作業ログ。
root@150-95-181-16:~# adduser mastodon
ユーザー `mastodon' を追加しています...
新しいグループ `mastodon' (1000) を追加しています...
新しいユーザー `mastodon' (1000) をグループ `mastodon' に追加しています...
ホームディレクトリ `/home/mastodon' を作成しています...
`/etc/skel' からファイルをコピーしています...
新しい UNIX パスワードを入力してください:
新しい UNIX パスワードを再入力してください:
passwd: password updated successfully
Changing the user information for mastodon
Enter the new value, or press ENTER for the default
    Full Name []:
    Room Number []:
    Work Phone []:
    Home Phone []:
    Other []:
以上で正しいですか? [Y/n] Y
root@150-95-181-16:~# gpasswd -a mastodon sudo
Adding user mastodon to group sudo
作成したユーザからsudoできるか確認します。
mastodon@150-95-181-16:~$ sudo uname -a
[sudo] mastodon のパスワード:
Linux 150-95-181-16 4.4.0-57-generic #78-Ubuntu SMP Fri Dec 9 23:50:32 UTC 2016 x86_64 x86_64 x86_64 GNU/Linux
次にSSHログインを許可します。
RSAAuthentication yes
PubkeyAuthentication yes
AuthorizedKeysFile %h/.ssh/authorized_keys
この3つをこのようにします
SSH keyの作成
ホスト側(VPS)で作業します。
mastodon@150-95-181-16:~$ cd ~/.ssh
mastodon@150-95-181-16:~/.ssh$ ssh-keygen -t rsa -b 2048
Generating public/private rsa key pair.
Enter file in which to save the key (/home/mastodon/.ssh/id_rsa): conohadev
Enter passphrase (empty for no passphrase):なし
Enter same passphrase again: なし
Your identification has been saved in conohadev.
Your public key has been saved in conohadev.pub.
The key fingerprint is:

mastodon@150-95-181-16:~/.ssh$ mv conohadev.pub authorized_keys
mastodon@150-95-181-16:~/.ssh$
mastodon@150-95-181-16:~/.ssh$ chmod 600 authorized_keys
mastodon@150-95-181-16:~/.ssh$ cat conohadev
-----BEGIN RSA PRIVATE KEY-----
上下の行含め全部コピー
-----END RSA PRIVATE KEY-----
mastodon@150-95-181-16:~/.ssh$
mastodon@150-95-181-16:~/.ssh$ exit
root@150-95-181-16:~# ログアウト
Connection to 150.95.181.16 closed.
ローカル(Mac)で作業
➜  ~ git:(master) ✗ cd ~/.ssh
➜  .ssh git:(master) ✗ vim conohadev
さっきコピーしたのを貼り付ける
➜  .ssh git:(master) ✗ chmod 600 conohadev
➜  .ssh git:(master) ✗ vim config
このように書く
#Conoha dev Server
Host conohadev.mastodon
  HostName 150.95.181.16
  User mastodon
  Port 22
  IdentityFile ~/.ssh/conohadev
➜  .ssh git:(master) ✗ ssh conohadev.mastodon
Welcome to Ubuntu 16.04.1 LTS (GNU/Linux 4.4.0-57-generic x86_64)

 * Documentation:  https://help.ubuntu.com
 * Management:     https://landscape.canonical.com
 * Support:        https://ubuntu.com/advantage

224 packages can be updated.
116 updates are security updates.


The programs included with the Ubuntu system are free software;
the exact distribution terms for each program are described in the
individual files in /usr/share/doc/*/copyright.

Ubuntu comes with ABSOLUTELY NO WARRANTY, to the extent permitted by
applicable law.

mastodon@150-95-181-16:~$ ls
mastodon@150-95-181-16:~$ pwd
/home/mastodon
mastodon@150-95-181-16:~$
きちんとssh接続できています。
もっと安全にするため、いくつか設定を変更していきます。
rootでのログイン禁止
- PermitRootLogin no
パスワードによるログインを禁止
- PasswordAuthentication no
sshdを再起動します。
$ sudo service sshd restart
➜  .ssh git:(master) ✗ ssh root@150.95.181.16
root@150.95.181.16: Permission denied (publickey).
成功です。
パッケージをアップグレードする
224 packages can be updated.
116 updates are security updates.
こんな感じでいっぱいあったので全部アップグレードしておきます。
sudo apt update
sudo apt upgrade
途中メッセージが出てきたので、ここは最新版いれとくかーって思って一番上を選びました。
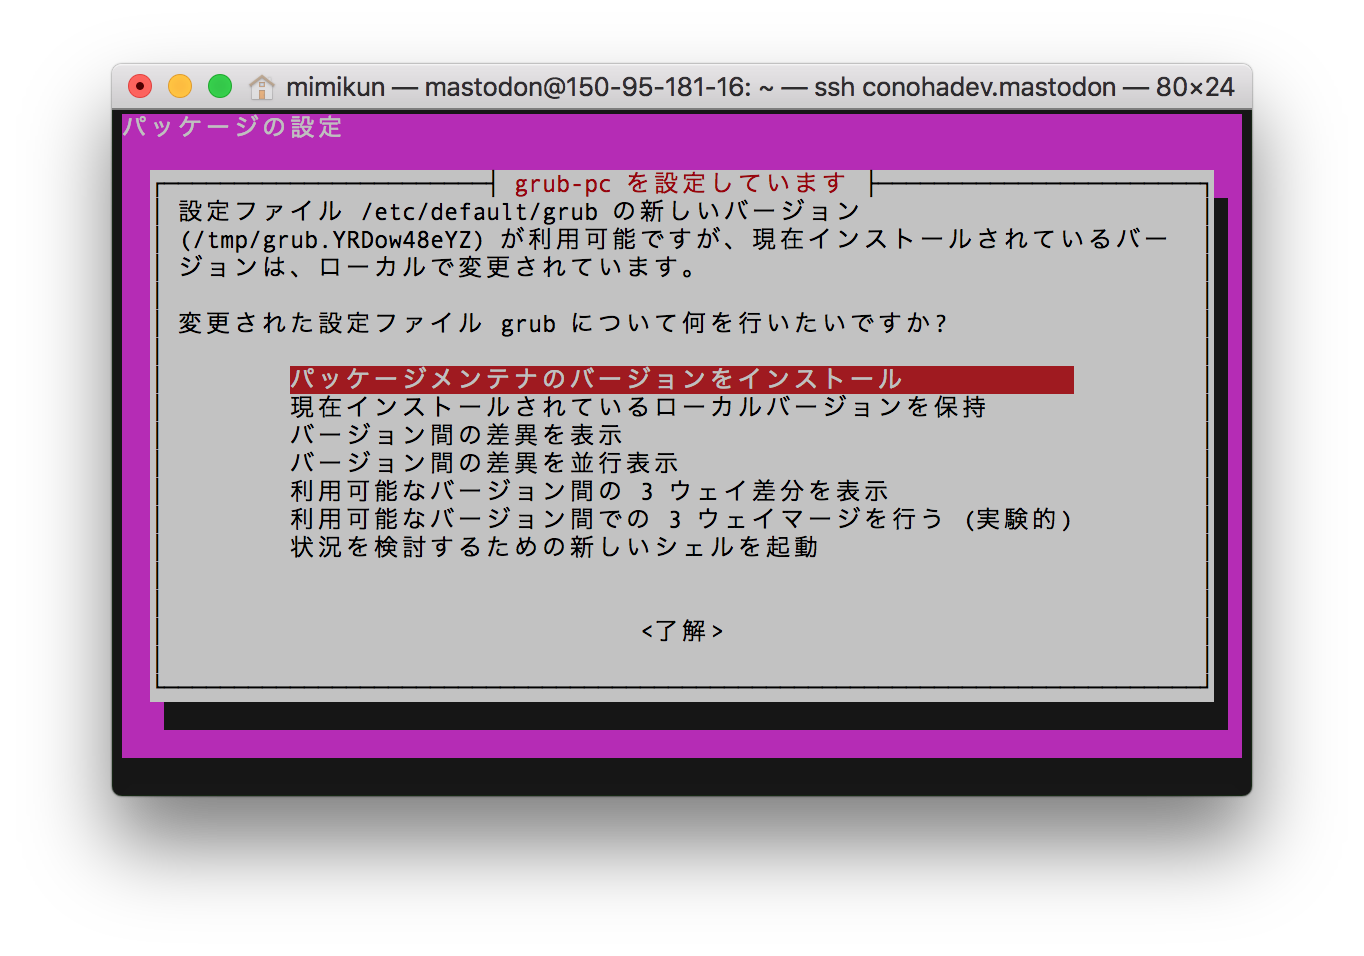
またもメッセージが出てきたのでここはデフォルトを選んでおきました。
設定ファイル '/etc/cloud/cloud.cfg'
 ==> これはインストールしてから (あなたかスクリプトによって) 変更されています。
 ==> パッケージ配布元が更新版を提供しています。
   どうしますか? 以下の選択肢があります:
    Y か I  : パッケージメンテナのバージョンをインストールする
    N か O  : 現在インストールされている自分のバージョンを残す
      D     : 両バージョンの差異を表示する
      Z     : 状況を調査するためにシェルを開始する
 デフォルトでは現在使っている自分のバージョンを残します。
*** cloud.cfg (Y/I/N/O/D/Z) [デフォルト=N] ?
終わったらVPSを再起動します。
$ sudo reboot
DNSレコード設定
スタードメインで、 mstdn-dev.mimikun.jp とVPSのIPをAレコードで紐付けしました。
Docker CE(Community Edition)のインストール
ここを見た。
Get Docker CE for Ubuntu | Docker Documentation
Install using the repository のところを見る。
- パッケージ一覧を更新し、何個かパッケージを入れる
$ sudo apt-get update
$ sudo apt-get install \
    apt-transport-https \
    ca-certificates \
    curl \
    software-properties-common
- GPGキーの追加
$ curl -fsSL https://download.docker.com/linux/ubuntu/gpg | sudo apt-key add -
- 安定版(stable)を入れるため、安定版のリポジトリ追加
$ sudo add-apt-repository \
   "deb [arch=amd64] https://download.docker.com/linux/ubuntu \
   $(lsb_release -cs) \
   stable"
- インストール作業を進めていく
$ sudo apt-get update
$ sudo apt-get install docker-ce
hello-worldイメージを実行し、正しくインストールされているか調べる
$ sudo docker run hello-world
結果:
Hello from Docker!
This message shows that your installation appears to be working correctly.

To generate this message, Docker took the following steps:
 1. The Docker client contacted the Docker daemon.
 2. The Docker daemon pulled the "hello-world" image from the Docker Hub.
    (amd64)
 3. The Docker daemon created a new container from that image which runs the
    executable that produces the output you are currently reading.
 4. The Docker daemon streamed that output to the Docker client, which sent it
    to your terminal.

To try something more ambitious, you can run an Ubuntu container with:
 $ docker run -it ubuntu bash

Share images, automate workflows, and more with a free Docker ID:
 https://cloud.docker.com/

For more examples and ideas, visit:
 https://docs.docker.com/engine/userguide/
正しくインストールされています。
続いてdocker-composeを入れていきます。
ここを見た。
Install Docker Compose | Docker Documentation
curlでバイナリを取ってきて入れるそう。
バージョンは最新のものにしたほうがいいので、GitHubのreleaseページを見て確認する。
Releases · docker/compose · GitHub
このコマンドを叩く。
$ sudo curl -L https://github.com/docker/compose/releases/download/1.20.0-rc2/docker-compose-`uname -s`-`uname -m` -o /usr/local/bin/docker-compose
次に実行権限を与える。
$ sudo chmod +x /usr/local/bin/docker-compose
必要に応じて、bashの入力補完をインストールする。
これはここを見た。
Command-line completion | Docker Documentation
このコマンドを叩けばいいらしい。
$ sudo curl -L https://raw.githubusercontent.com/docker/compose/1.19.0/contrib/completion/bash/docker-compose -o /etc/bash_completion.d/docker-compose
その後シェルを再起動する。
$ bash
この通り、入力補完が出来るようになっている。
$ sudo docker-compose [tab button]
build    down     images   port     restart  start    up
bundle   events   kill     ps       rm       stop     version
config   exec     logs     pull     run      top
create   help     pause    push     scale    unpause
きちんとインストールされたか確認する。
$ sudo docker-compose --version
docker-compose version 1.19.0, build 9e633ef
無事にインストールされている。
nginxの設定をする
ここを見た。 documentation/Production-guide.md at master · tootsuite/documentation · GitHub
のちのちの作業でも使うletsencryptも一緒に入れる。
sudo apt update
sudo apt install -y letsencrypt nginx
ここから見ていく。
documentation/Production-guide.md at master · tootsuite/documentation · GitHub
cd /etc/nginx/sites-available
vim /etc/nginx/sites-available/mstdn-dev.mimikun.jp.conf
これをコピペする。
自分はdocker構築のため、root を /home/mastodon/mastodon/public にしてある。
あとは、example.com のところを mstdn-dev.mimikun.jp に直す。
map $http_upgrade $connection_upgrade {
  default upgrade;
  ''      close;
}

server {
  listen 80;
  listen [::]:80;
  server_name mstdn-dev.mimikun.jp;
  root /home/mastodon/mastodon/public;
  # Useful for Let's Encrypt
  location /.well-known/acme-challenge/ { allow all; }
  location / { return 301 https://$host$request_uri; }
}

server {
  listen 443 ssl http2;
  listen [::]:443 ssl http2;
  server_name mstdn-dev.mimikun.jp;

  ssl_protocols TLSv1.2;
  ssl_ciphers HIGH:!MEDIUM:!LOW:!aNULL:!NULL:!SHA;
  ssl_prefer_server_ciphers on;
  ssl_session_cache shared:SSL:10m;

  ssl_certificate     /etc/letsencrypt/live/mstdn-dev.mimikun.jp/fullchain.pem;
  ssl_certificate_key /etc/letsencrypt/live/mstdn-dev.mimikun.jp/privkey.pem;

  keepalive_timeout    70;
  sendfile             on;
  client_max_body_size 0;

  root /home/mastodon/mastodon/public;

  gzip on;
  gzip_disable "msie6";
  gzip_vary on;
  gzip_proxied any;
  gzip_comp_level 6;
  gzip_buffers 16 8k;
  gzip_http_version 1.1;
  gzip_types text/plain text/css application/json application/javascript text/xml application/xml application/xml+rss text/javascript;

  add_header Strict-Transport-Security "max-age=31536000";

  location / {
    try_files $uri @proxy;
  }

  location ~ ^/(emoji|packs|system/accounts/avatars|system/media_attachments/files) {
    add_header Cache-Control "public, max-age=31536000, immutable";
    try_files $uri @proxy;
  }

  location /sw.js {
    add_header Cache-Control "public, max-age=0";
    try_files $uri @proxy;
  }

  location @proxy {
    proxy_set_header Host $host;
    proxy_set_header X-Real-IP $remote_addr;
    proxy_set_header X-Forwarded-For $proxy_add_x_forwarded_for;
    proxy_set_header X-Forwarded-Proto https;
    proxy_set_header Proxy "";
    proxy_pass_header Server;

    proxy_pass http://127.0.0.1:3000;
    proxy_buffering off;
    proxy_redirect off;
    proxy_http_version 1.1;
    proxy_set_header Upgrade $http_upgrade;
    proxy_set_header Connection $connection_upgrade;

    tcp_nodelay on;
  }

  location /api/v1/streaming {
    proxy_set_header Host $host;
    proxy_set_header X-Real-IP $remote_addr;
    proxy_set_header X-Forwarded-For $proxy_add_x_forwarded_for;
    proxy_set_header X-Forwarded-Proto https;
    proxy_set_header Proxy "";

    proxy_pass http://127.0.0.1:4000;
    proxy_buffering off;
    proxy_redirect off;
    proxy_http_version 1.1;
    proxy_set_header Upgrade $http_upgrade;
    proxy_set_header Connection $connection_upgrade;

    tcp_nodelay on;
  }

  error_page 500 501 502 503 504 /500.html;
}
その後、追加されたnginxの設定を有効にします。
cd /etc/nginx/sites-enabled
ln -s ../sites-available/mstdn-dev.mimikun.jp.conf
あとは不要な default を削除しておきます。
$ cd /etc/nginx/sites-enabled/
$ sudo rm default
$ cd /etc/nginx/sites-enabled/
$ sudo rm default
以上でnginxの設定は終わりです。
SSL証明書の設定をする
letsencryptを使う。
まずnginxを停止。
$ systemctl stop nginx
証明書をスタンドアロンモードで作成します。
sudo letsencrypt certonly --standalone -d mstdn-dev.mimikun.jp
するとこういう画面が出てきます。
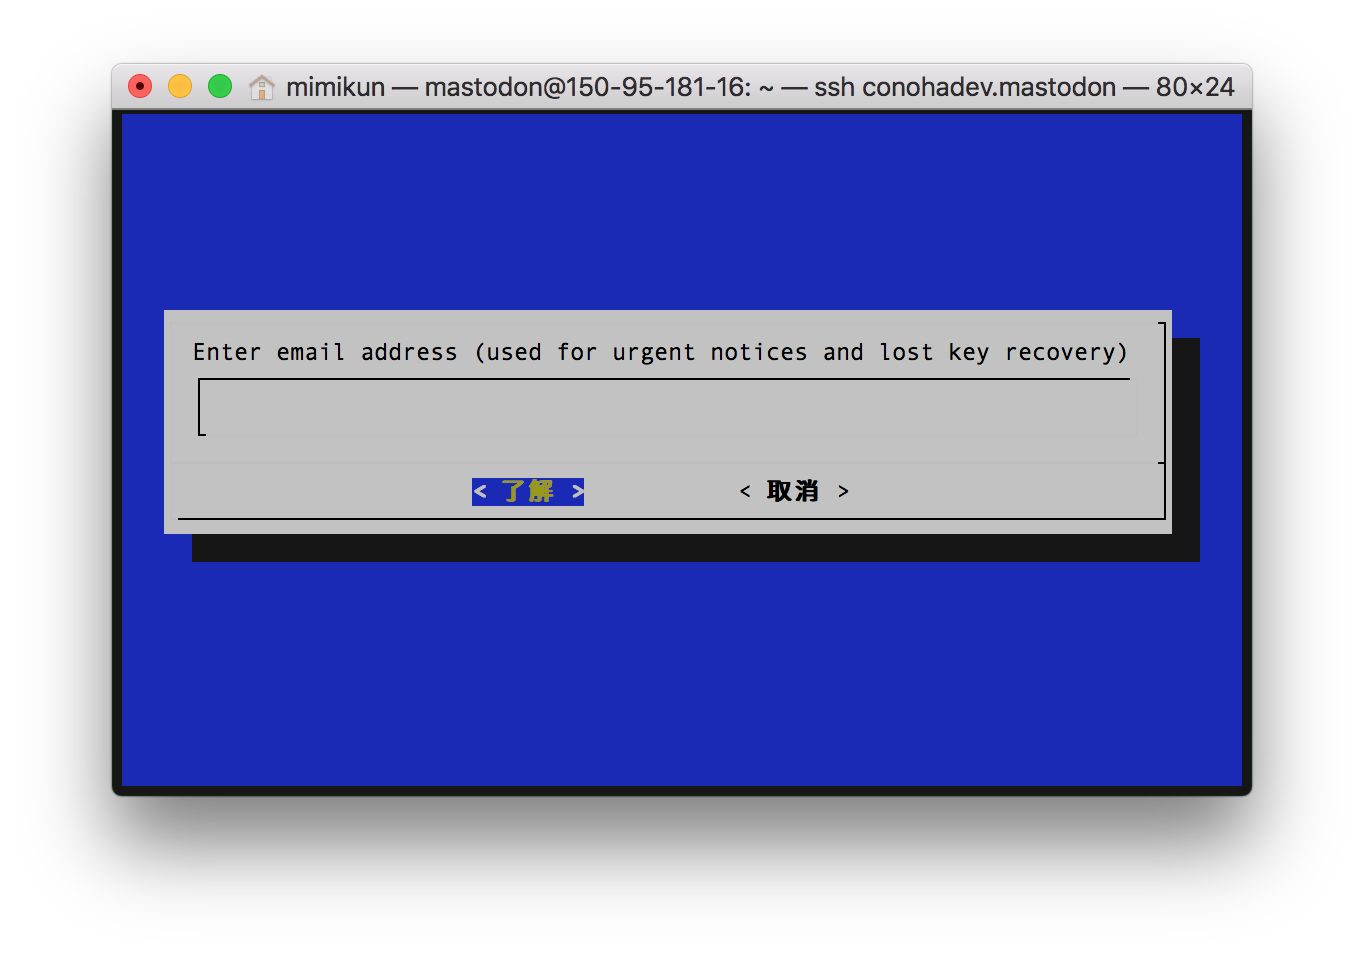
証明書が切れそうになったときにお知らせしてほしいメールアドレスのアドレスを入れます。
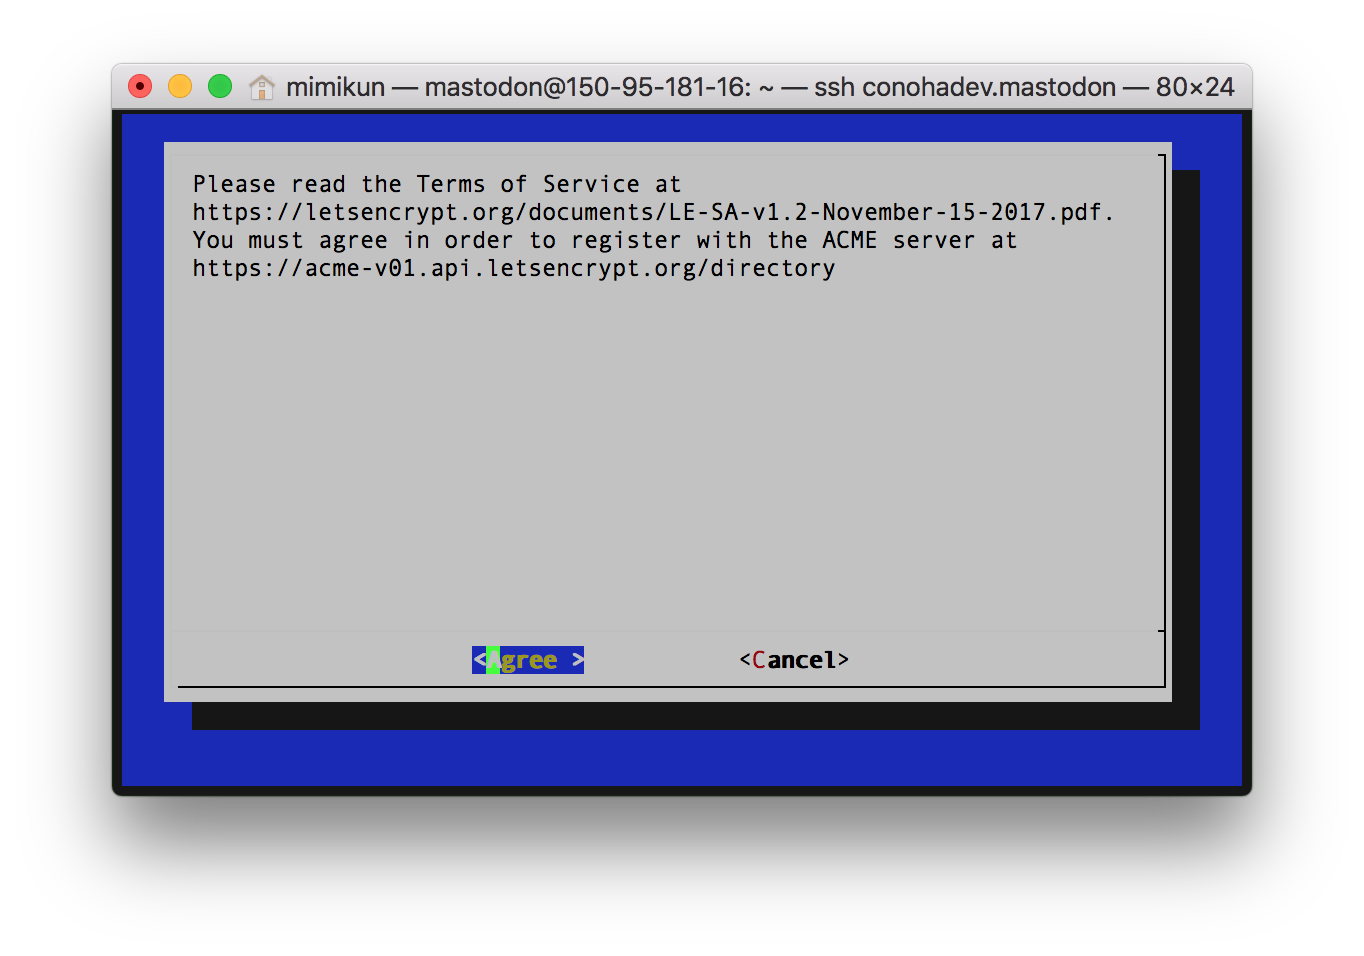
次に利用規約に同意するか聞かれるので agree を押します。
IMPORTANT NOTES:
 - If you lose your account credentials, you can recover through
   e-mails sent to karaage_nennen@icloud.com.
 - Congratulations! Your certificate and chain have been saved at
   /etc/letsencrypt/live/mstdn-dev.mimikun.jp/fullchain.pem. Your cert
   will expire on 2018-06-11. To obtain a new version of the
   certificate in the future, simply run Let's Encrypt again.
 - Your account credentials have been saved in your Let's Encrypt
   configuration directory at /etc/letsencrypt. You should make a
   secure backup of this folder now. This configuration directory will
   also contain certificates and private keys obtained by Let's
   Encrypt so making regular backups of this folder is ideal.
 - If you like Let's Encrypt, please consider supporting our work by:

   Donating to ISRG / Let's Encrypt:   https://letsencrypt.org/donate
   Donating to EFF:                    https://eff.org/donate-le
このように出てきました。成功しています。
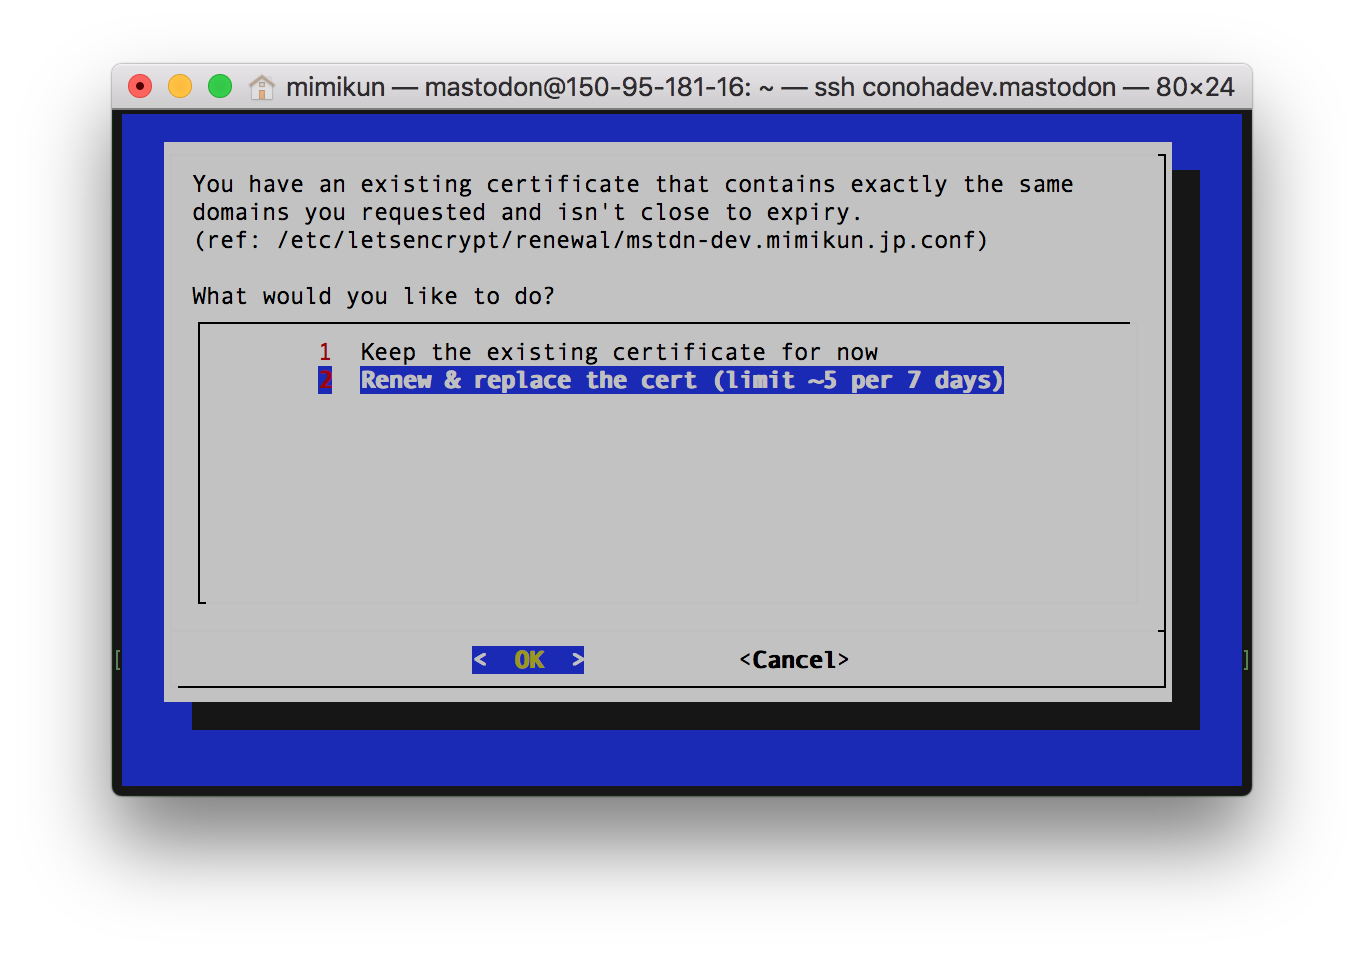
次は、nginxを有効化し、今度はwebrootメソッドを使用して証明書を発行します。
公式ドキュメントには、/home/mastodon/libe/publicに通せ、とあるけど、僕は/home/mastodon/mastodon ← ここにMastodonのアプリケーションがある こういう構成なので、
こうした。以下の通り。
sudo systemctl start nginx
# The letsencrypt tool will ask if you want issue a new cert, please choose that option
sudo letsencrypt certonly --webroot -d mstdn-dev.mimikun.jp -w /home/mastodon/mastodon/public/
するとこのような画像が出てきます。
ここは、証明書を再作成する 2 を選びます。
証明書自動更新の cron を設定する
これはここを見た。
documentation/Production-guide.md at master · tootsuite/documentation · GitHub
こうする。
sudo vim /etc/cron.daily/letsencrypt-renew
そしてこれをコピペする。
#!/usr/bin/env bash
letsencrypt renew
systemctl reload nginx
そしてスクリプトに実行権限を与え、cronを再起動する。
sudo chmod +x /etc/cron.daily/letsencrypt-renew
sudo systemctl restart cron
これでSSL証明書周りは終了。次はMastodon側の設定。
Amazon S3 の設定
オブジェクトストレージとして使うため、Amazon S3の設定をする。
Mastodon インスタンスの画像や動画の保存先をクラウドストレージ (Amazon S3) に移行した話 | WWW WATCH
この記事のとおり設定した。
記事にある AWS Policy Generator はうまく開くことができないのでここから開くと良い。
{
  "Id": "Policy1521024491749",
  "Version": "2012-10-17",
  "Statement": [
    {
      "Sid": "Stmt1521024484100",
      "Action": [
        "s3:GetObject"
      ],
      "Effect": "Allow",
      "Resource": "arn:aws:s3:::mstdn-dev.mimikun.jp/*",
      "Principal": "*"
    }
  ]
}
最終的にこのようなJSONが取得できる。
あとは、.env.productionにこのように書くだけ。
自分はアジアパシフィック(東京)に作ったのでこのようになっています。
$ vim .env.production
-----------------------------
S3_ENABLED=true
S3_BUCKET=[バケット名]
AWS_ACCESS_KEY_ID=[アクセスキー]
AWS_SECRET_ACCESS_KEY=[シークレットアクセスキー]
S3_REGION=ap-northeast-1
S3_PROTOCOL=https
S3_ENDPOINT=s3-ap-northeast-1.amazonaws.com
Mastodonのディレクトリをcloneしてくる
これはここを見た。
documentation/Docker-Guide.md at master · tootsuite/documentation · GitHub
$ git clone https://github.com/mimikun/mastodon.git
その後こうした。
$ git checkout mimikun/dev
$ git remote add upstream https://github.com/tootsuite/mastodon.git
データの永続化設定をするため、postgresとredisディレクトリを作成する。
$ mkdir redis postgres
設定ファイルを作成する。
$ cp .env.production.sample .env.production
イメージをビルドする。
$ sudo docker-compose build
次にセットアップをする。
対話形式でセットアップできるタスクがあるので実行する。
$ sudo docker-compose run --rm web rake mastodon:setup
生成したものを.env.production に貼り付ける。
$ vim .env.production
Cmd + V
最終的にできあがったのはこんな感じ。
バレたらマズイものは置き換えてあります。
# Generated with mastodon:setup on 2018-03-14 12:44:06 UTC

LOCAL_DOMAIN=mstdn-dev.mimikun.jp
SINGLE_USER_MODE=false
DEFAULT_LOCALE=ja
SECRET_KEY_BASE=自動生成される
OTP_SECRET=自動生成される
VAPID_PRIVATE_KEY=自動生成される
VAPID_PUBLIC_KEY=自動生成される
DB_HOST=db
DB_PORT=5432
DB_NAME=postgres
DB_USER=postgres
DB_PASS=
REDIS_HOST=redis
REDIS_PORT=6379
S3_ENABLED=true
S3_PROTOCOL=https
S3_BUCKET=mstdn-dev.mimikun.jp
S3_REGION=ap-northeast-1
S3_ENDPOINT=s3-ap-northeast-1.amazonaws.com
#S3_HOSTNAME=よくわからないので、コメントアウト。
AWS_ACCESS_KEY_ID=アクセスキー
AWS_SECRET_ACCESS_KEY=シークレットキー
# S3_CLOUDFRONT_HOST=僕は使わないので、コメントアウト。
SMTP_SERVER=smtp.mailgun.org
SMTP_PORT=587
SMTP_LOGIN=mailgunでもらったやつ
SMTP_PASSWORD=mailgunでもらったやつ
SMTP_FROM_ADDRESS=mailgunでもらったやつ
SMTP_AUTH_METHOD=plain
SMTP_OPENSSL_VERIFY_MODE=none
STREAMING_CLUSTER_NUM=1
自動でマイグレーションやアセットのプリコンパイルが行われるそうですが、non-Docker用?だったので、手動で行います。
If the database already exists, this will erase its contents.
Prepare the database now? Yes
Running `RAILS_ENV=production rails db:setup` ...
これ何かおかしいな、まぁDev鯖だから失敗しても別にいいだろ、という気持ちがあったので、途中でCtrl + Cを押して抜けました。
いい子は真似しないでね。
その時出たものは以下。
Prepare the database now? Yes
Running `RAILS_ENV=production rails db:setup` ...

Database 'postgres' already exists
rails aborted!
Devise.secret_key was not set. Please add the following to your Devise initializer:

  config.secret_key = 'シークレットキー'

Please ensure you restarted your application after installing Devise or setting the key.
/mastodon/vendor/bundle/ruby/2.5.0/gems/devise-4.4.0/lib/devise/rails/routes.rb:500:in `raise_no_secret_key'
/mastodon/vendor/bundle/ruby/2.5.0/gems/devise-4.4.0/lib/devise/rails/routes.rb:228:in `devise_for'
/mastodon/config/routes.rb:30:in `block in <top (required)>'
/mastodon/vendor/bundle/ruby/2.5.0/gems/actionpack-5.1.4/lib/action_dispatch/routing/route_set.rb:426:in `instance_exec'
/mastodon/vendor/bundle/ruby/2.5.0/gems/actionpack-5.1.4/lib/action_dispatch/routing/route_set.rb:426:in `eval_block'
/mastodon/vendor/bundle/ruby/2.5.0/gems/actionpack-5.1.4/lib/action_dispatch/routing/route_set.rb:408:in `draw'
/mastodon/config/routes.rb:8:in `<top (required)>'
/mastodon/vendor/bundle/ruby/2.5.0/gems/bootsnap-1.1.5/lib/bootsnap/load_path_cache/core_ext/kernel_require.rb:30:in `load'
/mastodon/vendor/bundle/ruby/2.5.0/gems/bootsnap-1.1.5/lib/bootsnap/load_path_cache/core_ext/kernel_require.rb:30:in `load'
/mastodon/vendor/bundle/ruby/2.5.0/gems/activesupport-5.1.4/lib/active_support/dependencies.rb:286:in `block in load'
/mastodon/vendor/bundle/ruby/2.5.0/gems/activesupport-5.1.4/lib/active_support/dependencies.rb:258:in `load_dependency'
/mastodon/vendor/bundle/ruby/2.5.0/gems/activesupport-5.1.4/lib/active_support/dependencies.rb:286:in `load'
/mastodon/vendor/bundle/ruby/2.5.0/gems/railties-5.1.4/lib/rails/application/routes_reloader.rb:55:in `block in load_paths'
/mastodon/vendor/bundle/ruby/2.5.0/gems/railties-5.1.4/lib/rails/application/routes_reloader.rb:55:in `each'
/mastodon/vendor/bundle/ruby/2.5.0/gems/railties-5.1.4/lib/rails/application/routes_reloader.rb:55:in `load_paths'
/mastodon/vendor/bundle/ruby/2.5.0/gems/railties-5.1.4/lib/rails/application/routes_reloader.rb:18:in `reload!'
/mastodon/vendor/bundle/ruby/2.5.0/gems/railties-5.1.4/lib/rails/application/routes_reloader.rb:41:in `block in updater'
/mastodon/vendor/bundle/ruby/2.5.0/gems/activesupport-5.1.4/lib/active_support/file_update_checker.rb:81:in `execute'
/mastodon/vendor/bundle/ruby/2.5.0/gems/railties-5.1.4/lib/rails/application/routes_reloader.rb:42:in `updater'
/mastodon/vendor/bundle/ruby/2.5.0/gems/railties-5.1.4/lib/rails/application/routes_reloader.rb:31:in `execute_if_updated'
/mastodon/vendor/bundle/ruby/2.5.0/gems/railties-5.1.4/lib/rails/application/finisher.rb:128:in `block in <module:Finisher>'
/mastodon/vendor/bundle/ruby/2.5.0/gems/railties-5.1.4/lib/rails/initializable.rb:30:in `instance_exec'
/mastodon/vendor/bundle/ruby/2.5.0/gems/railties-5.1.4/lib/rails/initializable.rb:30:in `run'
/mastodon/vendor/bundle/ruby/2.5.0/gems/railties-5.1.4/lib/rails/initializable.rb:59:in `block in run_initializers'
/mastodon/vendor/bundle/ruby/2.5.0/gems/railties-5.1.4/lib/rails/initializable.rb:58:in `run_initializers'
/mastodon/vendor/bundle/ruby/2.5.0/gems/railties-5.1.4/lib/rails/application.rb:353:in `initialize!'
/mastodon/config/environment.rb:5:in `<top (required)>'
/mastodon/vendor/bundle/ruby/2.5.0/gems/bootsnap-1.1.5/lib/bootsnap/load_path_cache/core_ext/kernel_require.rb:17:in `require'
/mastodon/vendor/bundle/ruby/2.5.0/gems/bootsnap-1.1.5/lib/bootsnap/load_path_cache/core_ext/kernel_require.rb:17:in `require'
/mastodon/vendor/bundle/ruby/2.5.0/gems/activesupport-5.1.4/lib/active_support/dependencies.rb:292:in `block in require'
/mastodon/vendor/bundle/ruby/2.5.0/gems/activesupport-5.1.4/lib/active_support/dependencies.rb:258:in `load_dependency'
/mastodon/vendor/bundle/ruby/2.5.0/gems/activesupport-5.1.4/lib/active_support/dependencies.rb:292:in `require'
/mastodon/vendor/bundle/ruby/2.5.0/gems/railties-5.1.4/lib/rails/application.rb:329:in `require_environment!'
/mastodon/vendor/bundle/ruby/2.5.0/gems/railties-5.1.4/lib/rails/application.rb:445:in `block in run_tasks_blocks'
/mastodon/vendor/bundle/ruby/2.5.0/gems/railties-5.1.4/lib/rails/commands/rake/rake_command.rb:21:in `block in perform'
/mastodon/vendor/bundle/ruby/2.5.0/gems/railties-5.1.4/lib/rails/commands/rake/rake_command.rb:18:in `perform'
/mastodon/vendor/bundle/ruby/2.5.0/gems/railties-5.1.4/lib/rails/command.rb:46:in `invoke'
/mastodon/vendor/bundle/ruby/2.5.0/gems/railties-5.1.4/lib/rails/commands.rb:16:in `<top (required)>'
/mastodon/vendor/bundle/ruby/2.5.0/gems/bootsnap-1.1.5/lib/bootsnap/load_path_cache/core_ext/kernel_require.rb:17:in `require'
/mastodon/vendor/bundle/ruby/2.5.0/gems/bootsnap-1.1.5/lib/bootsnap/load_path_cache/core_ext/kernel_require.rb:17:in `require'
/mastodon/vendor/bundle/ruby/2.5.0/gems/activesupport-5.1.4/lib/active_support/dependencies.rb:292:in `block in require'
/mastodon/vendor/bundle/ruby/2.5.0/gems/activesupport-5.1.4/lib/active_support/dependencies.rb:258:in `load_dependency'
/mastodon/vendor/bundle/ruby/2.5.0/gems/activesupport-5.1.4/lib/active_support/dependencies.rb:292:in `require'
bin/rails:4:in `<main>'
Tasks: TOP => db:setup => db:schema:load_if_ruby => environment
(See full trace by running task with --trace)

That failed! Perhaps your configuration is not right
$ sudo docker-compose run --rm web rake db:migrate
$ sudo docker-compose run --rm web rake assets:precompile
エラーが出て、アセットのプリコンパイルが出来なかったので、次のコマンドを実行します。
$ sudo chown -R 991:991 public/assets/
$ sudo chown -R 991:991 public/packs/
そして、コンテナを立ち上げます。
$ sudo docker-compose up -d
なぜか500エラーが出てリモートフォローできません。
とりあえず権限をいじってみます。
sudo chown -R 991:991 public/system
まだ500エラーが出ます・・・。
Mastodonで助言を求めました。
mimikun: "Mastodon立ち上げたのですが、500エラーが出て、リモートフォローが出来ないです 誰か教えて…" - :don:
.env.productionのS3_ENDPOINTがこうなっていたのが原因でした。
S3_ENDPOINT=s3-ap-northeast-1.amazonaws.com
変更しました。
S3_ENDPOINT=https://s3-ap-northeast-1.amazonaws.com
エラーメッセージはGoogle翻訳使ってしっかり読むようにしよう!(戒め)
これで、リモートフォローが出来るようになりました。
次にrakeタスクを実行し、管理者権限を与えます。
$ sudo docker-compose run --rm web rails mastodon:make_admin USERNAME=mimikun
ログは以下の通り。
$ sudo docker-compose run --rm web rails mastodon:make_admin USERNAME=mimikun
Starting mastodon_redis_1 ... done
Starting mastodon_db_1    ... done
Congrats! mimikun is now an admin. \o/
Navigate to https://mstdn-dev.mimikun.jp/admin/settings/edit to get started
あとは必要に応じて2FAなど設定します。
これで終わりです。
もっとインスタンス立てまくればこの作業も慣れるのかな、と思いました。
docker-composeのバグを踏んだのでアップグレードした話
タイトルの通り。
経緯とか
mimikun✅: "ビルドしようと思ったら、以下の通りのエラーが発生" - mimikun丼
Mastodonというアプリケーションがある。
このアプリケーションはDockerを使ってサクッと構築できる。
今日(2018/03/14)、docker-compose buildをしようとしたら、このようなエラーが表示された。
$ sudo docker-compose build
redis uses an image, skipping
db uses an image, skipping
Building streaming
Traceback (most recent call last):
  File "bin/docker-compose", line 6, in <module>
  File "compose/cli/main.py", line 71, in main
  File "compose/cli/main.py", line 124, in perform_command
  File "compose/cli/main.py", line 254, in build
  File "compose/project.py", line 372, in build
  File "compose/service.py", line 989, in build
  File "site-packages/docker/api/build.py", line 150, in build
  File "site-packages/docker/utils/build.py", line 14, in tar
  File "site-packages/docker/utils/utils.py", line 103, in create_archive
IOError: Can not access file in context: /home/mastodon/mastodon/public/500.html
Failed to execute script docker-compose
dockerとdocker-composeのバージョンは以下の通り。
$ sudo docker -v
Docker version 17.12.1-ce, build 7390fc6
$ sudo docker-compose --version
docker-compose version 1.19.0, build 9e633ef
色々しらべた。
docker-compose build on macos failing with procfs · Issue #5728 · docker/compose · GitHub
IOError: Can not access file in context · Issue #1813 · docker/for-win · GitHub
どうやら、v1.19.0がバグを持っているらしい。
なのでダウングレードかアップグレードをする必要がある。
自分はどうせなら新しい方がいいかな、と思い1.20.0-rc2を入れた。
手順は以下。
- バイナリをダウンロードしてきて、上書き保存
- 実行権限を付与
といったことをしている。
アップグレード(v1.20.0-rc2)
$ sudo curl -L https://github.com/docker/compose/releases/download/1.20.0-rc2/docker-compose-`uname -s`-`uname -m` -o /usr/local/bin/docker-compose
$ sudo chmod +x /usr/local/bin/docker-compose
ダウングレード(v1.18.0)
$ sudo curl -L https://github.com/docker/compose/releases/download/1.18.0/docker-compose-`uname -s`-`uname -m` -o /usr/local/bin/docker-compose
$ sudo chmod +x /usr/local/bin/docker-compose